
Pearl identifier by photo
Compare a pearl or strand by photo. Explore luster, surface, shape and drill-hole clues for pearl types and imitations, then ask a follow-up.
- Pearls & imitation pearls
- Explains each match
- 3 free identifications per day
- 01
Upload Photos of One Pearl
Add one to three views of a pearl: pearl or strand on white paper in daylight, sharp close-up of a drill hole and close view of the surface. JPG, PNG and WebP files are supported, up to 40 MB each. A location and your own observations are optional.
- 02
Review Matches and Evidence
A result presents a suggested name alongside visible clues, limitations and possible alternatives. Read those explanations together. Compare the explanation with your own photographs and leave the name open when the visible evidence does not distinguish the candidates.
- 03
Ask a Follow-up Question
Use the available follow-up to ask about lookalikes, typical properties or care. The reply stays with that specimen. When you want to investigate another find, start a new identification with its own photos.
Photo-based identification can suggest possible matches, but it cannot definitively confirm a specimen’s actual composition.
Keep exploring
Identify Another Rock, Try a Sample, or View Your History
Choose an identification, a sample walkthrough, or your saved history.

Photo guide
Get practical tips for showing shape, surface details and different angles.
Read the guidePhoto guide updated
How to use the pearl identifier
The pearl identifier compares photos of a pearl, a strand or a piece of pearl jewelry with pearl types and common imitations. Upload one to three photos of the same piece: the pearl or strand on white paper in daylight, a sharp close-up of a drill hole, and a close view of the surface. Then say what form it is in: a loose pearl, a strand or bracelet, a ring, earring or pendant, or not sure.
The result lists possible matches and the visible clues behind each, names the imitations or other pearl types that still fit, says what the photos could not settle, and ends with a follow-up question you can answer or ask about. Where the piece was bought is the most useful note to add. Each name is a possible match, not a confirmed identity or a value.
Luster and overtone: how a pearl reflects light
A nacreous pearl is built from nacre, thin layers that a mollusk lays down around an irritant or a bead. Light reflecting from those layers gives luster. GIA calls luster possibly the most important quality factor and grades it from sharp, bright reflections down to dim, diffused ones. In your photo, look at the reflection of the window on the pearl: a crisp reflection fits high luster, and a blurry, chalky look can mean thin nacre.
GIA also explains that many pearls show overtone, a translucent color over the main bodycolor, typically pink, green, purple or blue, and that some show orient, a soft rainbow shimmer. Imitations often have a glassy shine that looks the same everywhere, with no depth and no overtone. Photos for the pearl identifier work best in daylight on white paper, without flash.
Surface and drill-hole clues the pearl identifier checks
Close up, real pearls are rarely perfect. GIA notes that most pearls have some surface imperfections, and slight differences between the pearls in one strand are normal. A fine, wrinkled or contour-line pattern in a sharp close-up fits nacre. Beads that are identical in size, color and finish point toward imitations. Matching alone does not prove an imitation; genuine cultured pearls can be carefully matched for a strand.
The drill hole is the best window into a pearl. Layered nacre at the edge of the hole fits a pearl. A thin coating that chips or peels near the hole to show glass, plastic or a white shell bead fits an imitation; a GIA lab note on coated “shell pearls” describes this chipping near the drill holes. Bubbles at the hole point toward glass, a very light, warm bead toward plastic, and dye collecting around the hole toward a dyed pearl.
Freshwater, Akoya, South Sea and Tahitian cultured pearls
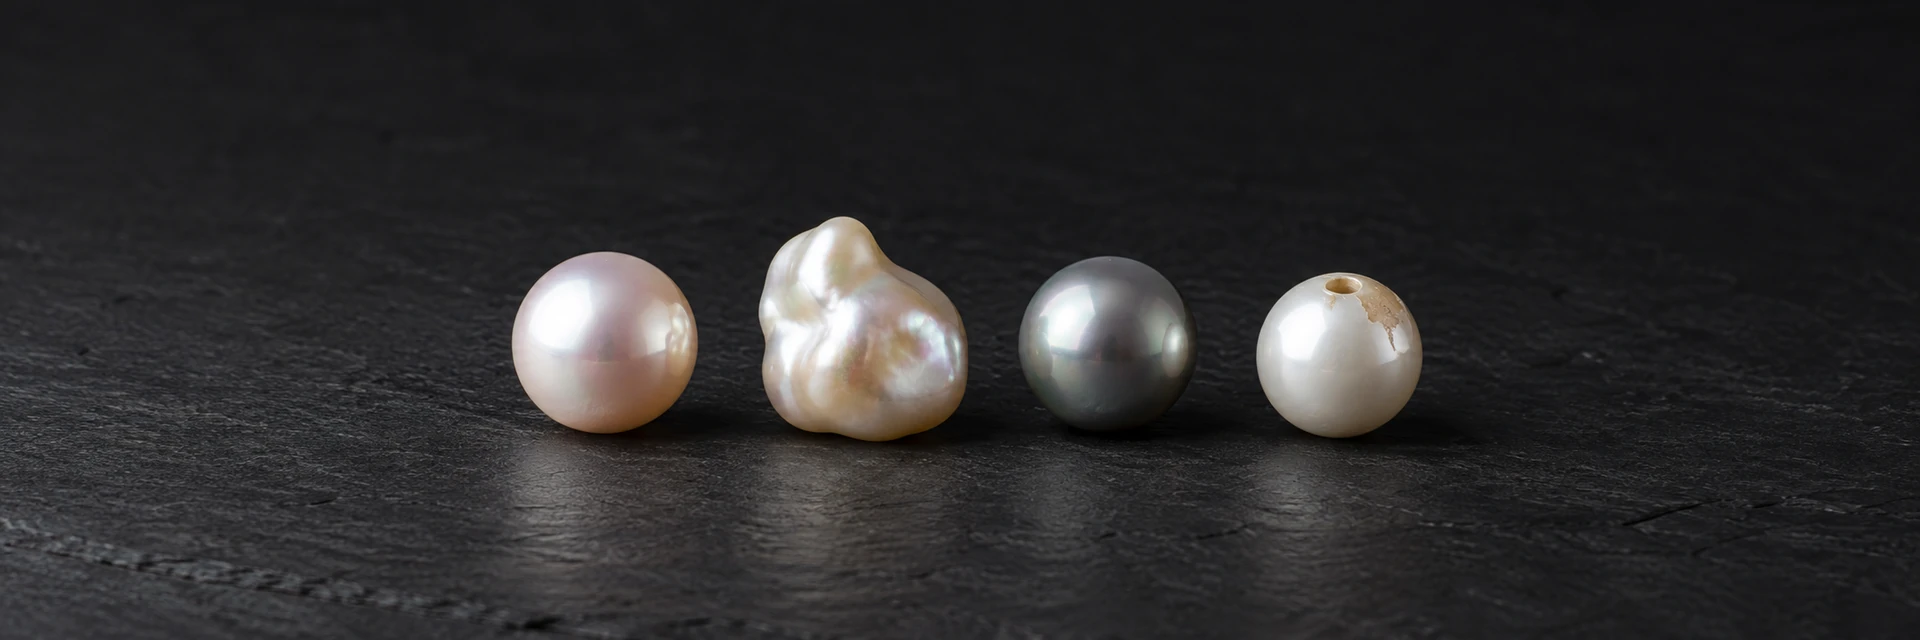
Most pearls sold today are cultured. GIA explains that a technician places tissue, sometimes with a shell bead, into a host mollusk, which coats it with nacre. Freshwater cultured pearls are the most commonly produced, grown mainly in China; they are often off-round, rice or potato shaped, white, pink or lavender, and slightly wrinkled. Akoya cultured pearls, from Japan and China, are smaller, round and white with pink or silver overtones and sharp reflections.
South Sea cultured pearls, from Australia, Indonesia and the Philippines, are large and white, silver or golden, with a satiny look. Tahitian cultured pearls from French Polynesia, often called black pearls, range from gray to black or brown with blue, green, purple or pink overtones. The pearl identifier uses size, shape and color to suggest a type, but dyed pearls imitate the dark and golden ones.
Baroque, keshi, mabe and other pearl shapes
Shape hints at how a pearl grew. Irregular, lumpy shapes are baroque pearls, which occur in every type. Small, irregular pearls with no bead inside are often sold as keshi. A dome with a flat back fits a mabe or blister pearl, grown against the inside of a shell and cut out. Mabe pearls are often assembled, with the bead removed and the dome filled and backed.
A few pearls have no nacre at all. Pink to orange pearls with a flame-like pattern fit conch pearls, and orange ones fit melo pearls. Flat, pearly pieces are mother-of-pearl, the lining of a shell rather than a pearl.
For a pearly shell such as an abalone or a mussel, use the shell identifier.
Pearl identifier lookalikes: glass, shell and plastic beads
A good imitation can pass in a photo. When the clues do not separate them, the result reads “pearl or imitation pearl.”
What you see | What it may point to | Photo that helps next |
|---|---|---|
Identical size, color and glassy shine in every bead | Imitation pearl (coated glass or plastic) | Sharp close-up of several drill holes |
Coating chipped or peeling at the hole, white bead below | Shell pearl, a coated shell bead imitation | The hole edge in sharp focus |
Round bubbles or a glassy core at a chip | Coated glass bead | Close view of the chip in daylight |
Very light, warm feel and a seam around the bead | Plastic bead | Side view showing the seam |
Very dark or unusual color, deeper at the hole | Dyed pearl | Drill hole close-up on white paper |
White, opaque, chalky beads with no luster | Howlite or ceramic beads | Surface close-up in daylight |
Why natural or cultured needs a laboratory
From the outside, a natural pearl and a cultured pearl can look the same, so laboratories look inside. GIA describes real-time X-ray imaging and X-ray micro-computed tomography that show a bead nucleus or the growth rings of a natural pearl, and even then a GIA study of two pearls could not settle their origin. A photo cannot separate natural from cultured, measure nacre thickness, confirm bleaching or set a value.
Use only gentle checks: daylight, white paper, a ruler for size, and how heavy the piece feels. Do not rub a pearl against your teeth, scratch it, heat it or test it with any chemical; nacre is thin and soft, and those tests can mark a real pearl. For an heirloom or a costly purchase, a gemological laboratory can issue a pearl identification report.
For colored stones set beside the pearls, use the gemstone identifier.
Keep a repeatable pearl photo record
Keep the whole piece and its close-ups together so one bead is not accidentally compared with a different bead later. On a strand, choose one recognizable pearl near the clasp and state which one the close-up shows. Photograph an existing drill hole without pulling a knot apart, removing a setting or enlarging the hole. Include a ruler beside the piece when size matters, and keep any seller description separate from what the photograph actually shows.
For a follow-up, compare the same surface in two ordinary daylight views. Record whether a reflection moves as the pearl turns and whether a suspected chip stays visible from another angle. A white spot may be glare, dust or damage; a single image need not settle which. Keep the result as a provisional comparison if the hole is hidden or the surface is blurred. Useful records preserve the uncertainty rather than converting a familiar color into proof of pearl type or origin.
Common questions about the pearl identifier
How can I tell if my pearls are real?
Layered nacre at a hole, small differences between pearls and a fine wrinkled surface fit real pearls; peeling coatings, bubbles and perfectly identical beads fit imitations. The pearl identifier can point toward one or the other, and a gemologist can test the strand in person.
Are my pearls natural or cultured?
A photo cannot tell. Most pearls on the market are cultured and natural pearls are rare, but only a laboratory can separate them, using X-ray imaging. Have an old family strand tested before you sell or insure it.
Why are my pearls such different colors?
Freshwater pearls grow in white, pink and lavender, and Tahitian pearls in many dark shades. Very dark or unusual colors that collect at the drill holes point toward dye, which a laboratory can confirm.