
Arrowhead identifier by photo
Compare a possible arrowhead or stone tool by photo. Explore flake scars, outline and stone type, natural breaks and reproductions, then ask a follow-up.
- Arrowheads & stone tools
- Explains each match
- 3 free identifications per day
Upload arrowhead photos
Drag your photos here, or choose a file to begin.
JPG, PNG, WebP or HEIC · Up to 3 photos · 40 MB each · You can also paste a photo
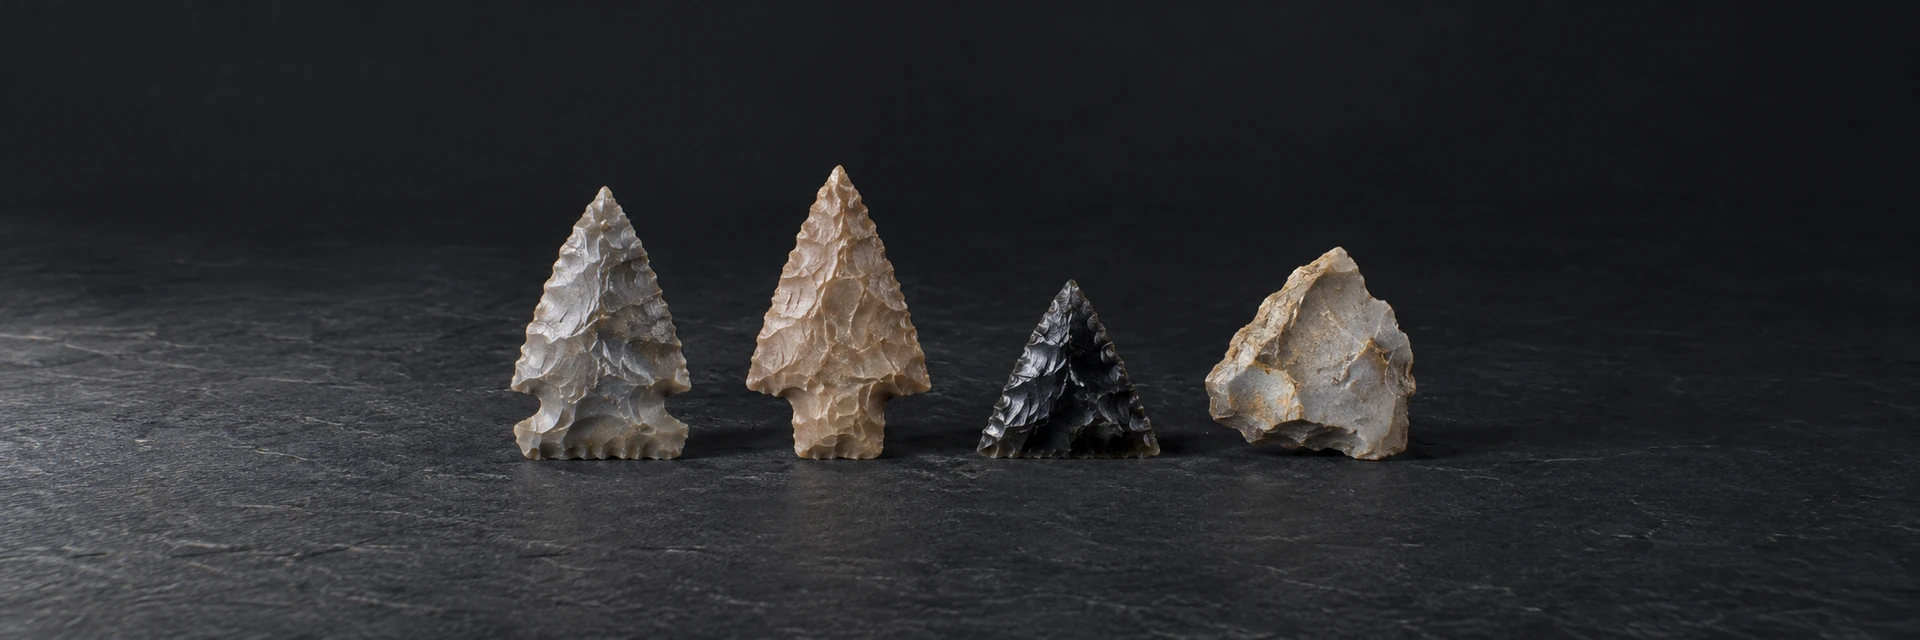
Flint arrowhead (modern replica) · photo by James St. John, CC BY 2.0 · Resized and converted to WebP.
- 01
Upload Photos of One Arrowhead
Add one to three views of an arrowhead: front face beside a ruler, back face and base seen edge-on. JPG, PNG and WebP files are supported, up to 40 MB each. A location and your own observations are optional.
- 02
Review Matches and Evidence
A result presents a suggested name alongside visible clues, limitations and possible alternatives. Read those explanations together. Compare the explanation with your own photographs and leave the name open when the visible evidence does not distinguish the candidates.
- 03
Ask a Follow-up Question
Use the available follow-up to ask about lookalikes, typical properties or care. The reply stays with that specimen. When you want to investigate another find, start a new identification with its own photos.
Photo-based identification can suggest possible matches, but it cannot definitively confirm a specimen’s actual composition.
Keep exploring
Identify Another Rock, Try a Sample, or View Your History
Choose an identification, a sample walkthrough, or your saved history.

Sample walkthrough
Try the flint arrowhead (modern replica) photo and review its result.
Flint arrowhead (modern replica) · photo by James St. John, CC BY 2.0 · Resized and converted to WebP.
Photo guide
Get practical tips for showing shape, surface details and different angles.
Read the guidePhoto guide updated
How to use the arrowhead identifier
The arrowhead identifier compares a possible arrowhead or stone tool with knapped tools, naturally broken stone and modern reproductions. Upload one to three photos of the same piece: the front face beside a ruler, the back face, and the base seen edge-on. Then choose where it was found: private land with permission, public land, bought or inherited, or not sure.
The result lists possible matches, the visible clues behind each one, the lookalikes that still fit, and what the photos could not settle. It ends with a follow-up question you can answer or ask about, most often where the piece was found.
Lay the piece flat on a plain background in daylight, with the ruler beside it, and skip the flash, which flattens flake scars.
Deliberate flaking or a natural break: what the arrowhead identifier checks first
The National Park Service explains that flintknapping makes a stone tool by knocking smaller pieces off a larger rock. Each removed flake leaves a shallow, shell-shaped scar. On a knapped tool, these scars overlap and run in from the edges on one or both faces, small regular chips line the edges, and the outline is often symmetrical.
A loose flake has its own signs. The NPS describes the striking platform, where the maker struck the stone, as often dull or pitted, with a bulge called the bulb of percussion just below it. Random fractures, scars of different ages and weathering, edges crushed from tumbling in gravel, and round frost pop-outs all point toward a natural break. A photo often cannot separate a simple flake from a natural break, and the result then says so.
Points, scrapers, drills, flakes and cores
Once possible deliberate flaking shows, the arrowhead identifier compares the overall form. A pointed, bifacially flaked piece may be a projectile point or another pointed tool. Size is useful context, but there is no universal four-centimeter cutoff that proves an arrowhead rather than a dart or spear point. The National Park Service explains that a point’s shape alone often cannot establish which projectile carried it.
A steep retouched edge can support a scraper comparison, and a narrow projecting bit can suggest a drill. A sharp flake can be manufacturing debris or an expedient cutting tool; lack of retouch does not prove it was unused. A block with removals from several directions may be a core. Larger bifaces can include knives or unfinished tools, so describe the visible form before inferring function.
Notches, stems and bases: reading the outline
Side-notched points have a notch cut into each side above the base. Corner-notched points have notches angled in from the base corners. Stemmed points have a narrow stem below the shoulders, triangular points have no notches, and lanceolate points are leaf-shaped without notches. Some edges are serrated like a saw. A long channel flake running up from the base marks a fluted point in the Clovis or Folsom style, but a photo cannot confirm one, and fakes are common.
Type names belong to regions. The NPS describes the Lamoka point, a side-notched point of the Lamoka culture of New York and Pennsylvania, named for a site near Lamoka Lake. A similar outline can carry different names in different regions, so the arrowhead identifier says only that a point resembles a type, and only when the outline and base are clear. A photo never dates a point; age comes from where a point lay in a site and what was found with it.
Chert, flint, obsidian and other stone types
Most sharp stone tools that survive from prehistoric North America are made of chert, according to the NPS, and some cherts are known as flint. Chert and flint look waxy and opaque, in almost any color. Obsidian is glassy black or gray with translucent edges. Quartzite is grainy and dull, quartz glassy white to clear, jasper opaque red or yellow, chalcedony translucent and waxy, and petrified wood shows wood grain.
If the piece is already lawfully in your possession, photograph a thin edge against daylight without handling it by the sharp edge. Translucency can help compare materials, but does not establish a tool’s age or use. Surface gloss alone cannot prove heat treatment: lighting, raw material and weathering also affect its appearance.
For a glassy black piece with no clear flaking, compare it with the obsidian identifier. For a stone with no flake scars at all, open “what type of rock is this?” to compare rock types.
Arrowhead identifier lookalikes: natural breaks and reproductions
Modern knappers make points for crafts, teaching and sale. Bottle glass or porcelain can support a manufactured-material comparison. Fresh-looking scars, symmetry, unusual color and gloss alone cannot establish when a stone point was made; old objects can look fresh and reproductions can be weathered. The arrowhead identifier keeps an undated knapped point open as an option and does not authenticate or price it as an ancient artifact.
What you see | What it may point to | Photo that helps next |
|---|---|---|
Overlapping shell-shaped scars from the edges on both faces | Knapped projectile point or biface | Both faces flat beside a ruler |
Random fractures with scars of mixed weathering | Naturally broken stone (not a tool) | Each broken edge up close in daylight |
Round, dish-shaped pits on a face | Frost pop-outs (natural) | Low-angle light across the face |
Flat sharp piece with a bulge below one end, no retouch | Flake (knapping waste) or natural break | The struck end seen edge-on |
Fresh-looking scars, symmetry, gloss or unusual color | Knapped point of unresolved age; reproduction remains possible | Both faces and close views of the base and scar intersections |
Public land, private land and what a photo cannot tell
The Bureau of Land Management instructs visitors to leave cultural artifacts in place on BLM land. National parks and other protected areas have their own rules. Rules vary by jurisdiction and land ownership; the tool cannot decide whether collecting a particular object is lawful.
For a new find, photograph it where it lies without disturbing the ground, note the location privately and contact the responsible land manager or heritage office. Owner permission alone may not settle every restriction on private land. Check applicable rules before handling or collecting, and do not dig for artifacts.
A photo cannot establish age, authenticity, cultural affiliation or legal status. A state archaeologist, a state historic preservation office, a university anthropology department or a museum can look at a find in hand.
Make both-face photographs easy to compare
For a piece already lawfully held, keep the same tip orientation in the front and back views and include a ruler in the same plane. A base close-up should show the notches, any stem and the thickness without hiding the edge with fingers. Record a broken tip or missing base explicitly; a cropped photograph should not make a fragment appear complete. Do not chip an edge, scrape a surface or attempt to reproduce a fracture to test an identification.
Keep the find context separate from the visual description. A seller label or family story can guide a question, but it does not date the object. For a new find still in place, prioritize an undisturbed contextual photograph and a private location record. Never post sensitive site coordinates in a public follow-up.
Common questions about the arrowhead identifier
Can I keep an arrowhead I found on public land?
On BLM land, leave cultural artifacts where they are and contact the land manager. National parks, tribal lands and state areas have specific protections. Check with the responsible authority before disturbing any find; the tool does not determine legal status.
How old is my arrowhead?
A photo cannot date a point. Archaeologists date points from where they lay in a site and what was found with them, such as charcoal in a hearth. The outline can only suggest which regional type a point resembles.
Is my arrowhead real or a reproduction?
Photographs may show deliberate flaking but cannot confirm age or authenticity. Crisp scars, symmetry, gloss and color alone do not distinguish an old point from a modern one. Keep the interpretation provisional and ask a museum or archaeologist what further documentation would help.