
Metal identifier by photo
Compare a metal piece or found relic by photo. Explore color, corrosion and marks to narrow copper, brass, iron, aluminum, lead or silver, then ask a follow-up.
- Metals, alloys & relics
- Explains each match
- 3 free identifications per day
Upload metal piece photos
Drag your photos here, or choose a file to begin.
JPG, PNG, WebP or HEIC · Up to 3 photos · 40 MB each · You can also paste a photo
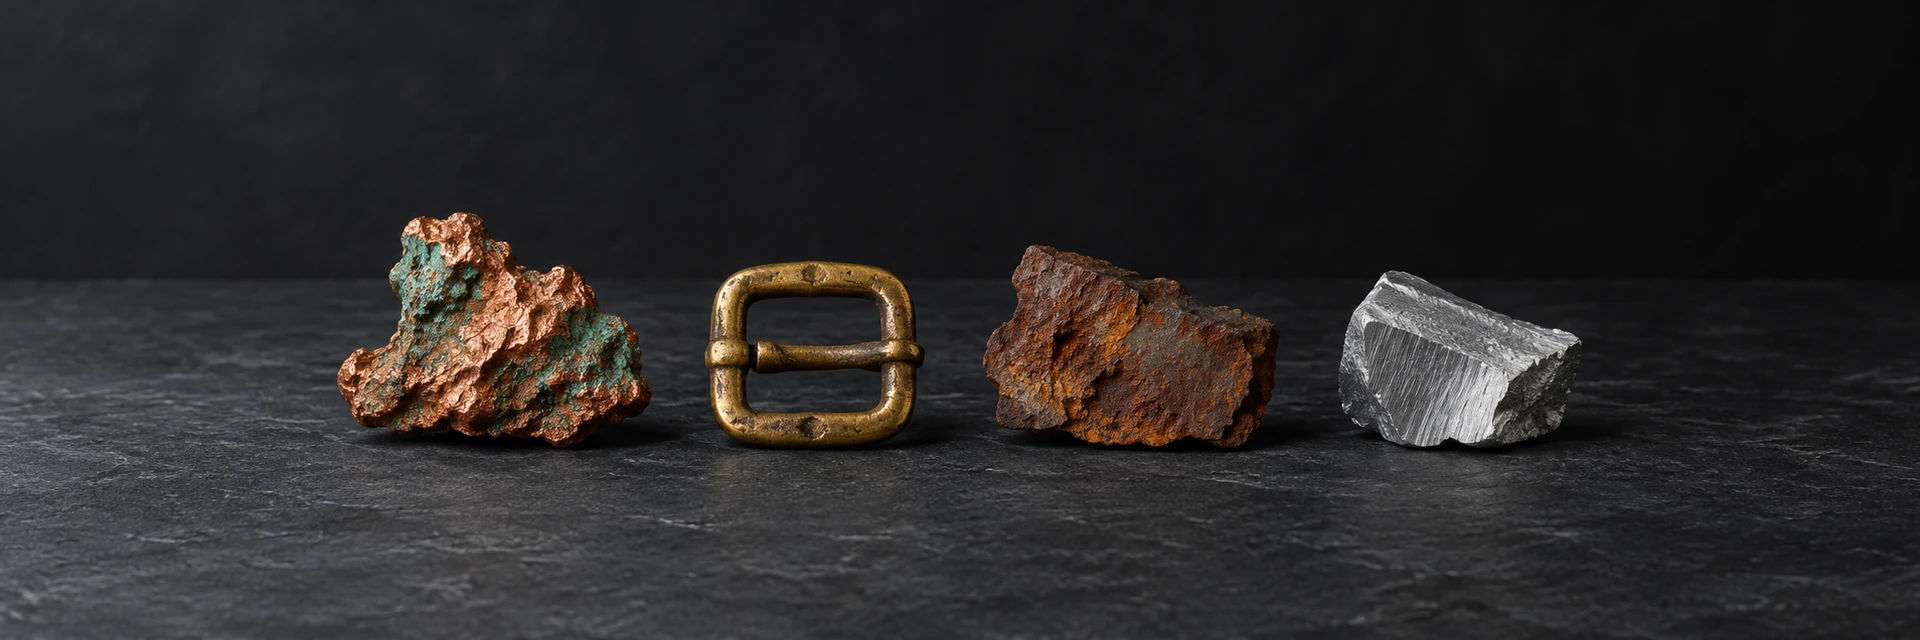
Native copper · photo by James St. John, CC BY 2.0 · Resized and converted to WebP.
- 01
Upload Photos of One Metal Piece
Add one to three views of a metal piece: whole piece beside a ruler, an already exposed area in neutral light and complete visible marks without cleaning. JPG, PNG and WebP files are supported, up to 40 MB each. A location and your own observations are optional.
- 02
Review Matches and Evidence
A result presents a suggested name alongside visible clues, limitations and possible alternatives. Read those explanations together. Compare the explanation with your own photographs and leave the name open when the visible evidence does not distinguish the candidates.
- 03
Ask a Follow-up Question
Use the available follow-up to ask about lookalikes, typical properties or care. The reply stays with that specimen. When you want to investigate another find, start a new identification with its own photos.
Photo-based identification can suggest possible matches, but it cannot definitively confirm a specimen’s actual composition.
Keep exploring
Identify Another Rock, Try a Sample, or View Your History
Choose an identification, a sample walkthrough, or your saved history.

Sample walkthrough
Try the native copper photo and review its result.
Native copper · photo by James St. John, CC BY 2.0 · Resized and converted to WebP.
Photo guide
Get practical tips for showing shape, surface details and different angles.
Read the guidePhoto guide updated
How to use the metal identifier
The metal identifier compares a metal piece or found relic with copper, brass, bronze, silver, gold, aluminum, iron and steel, lead, zinc and pewter. Upload one to three photos of the same piece: the whole piece beside a coin, a close view of a worn or clean spot, and a sharp close-up of any marks. Then choose where it is from: a metal detecting find, a household item, scrap or workshop, or not sure.
The result lists possible material groups, the visible clues behind them, and alternatives the photographs cannot separate. It also explains what remains unknown and offers a follow-up question. Existing notes about the object or a previously observed magnet response may help, but the tool treats them as unverified context rather than properties measured from the image.
The metal identifier works in a set order: metal or not, the color of clean or worn metal, the corrosion color, the form, and last any marks and stamps. Paint, plating and corrosion can hide the base metal, so a worn spot often says more than a shiny face.
The color of clean metal
An already exposed area can show a different appearance from paint, plating or corrosion. Reddish tones may support copper-rich material, while yellow or brown tones can support several copper-alloy comparisons. Silvery surfaces have many possible compositions. The Canadian Conservation Institute provides examples, but photographs do not measure the elements present or reveal every underlying layer.
Aluminum, zinc, tin, lead, silver and steels can overlap in gray appearance. A polished surface may reflect the room rather than its own color. Rust-like areas can support an iron-containing comparison, but the absence of rust does not identify stainless steel. Photograph existing wear and any full mark in neutral light; do not clean or scratch a new patch for the tool.
Corrosion colors: what the metal identifier reads next
Corrosion patterns add context, especially when an object has several exposed areas. Copper-containing materials can develop green, blue-green, brown or dark products. Brass and bronze often remain difficult to distinguish visually. A green spot may belong to a coating, solder or adjacent component, so show where it sits on the complete object before assigning a material group.
Orange-brown layers may support rust, while white or dark crusts occur on several metals. The photograph cannot establish the chemistry of a powder or whether it is safe to handle. Record color and texture separately from the proposed material. Thick corrosion can conceal the evidence needed for an answer, and an unresolved result is appropriate when the substrate is hidden.
Plating, paint and worn high points
A naturally worn high point can expose a contrasting layer, but the color boundary may also be a repair, solder, paint or a separate fitting. Describe the location and compare another view before proposing plating. A silver-colored surface over reddish material may support a plated copper-alloy comparison; it does not verify either layer’s composition or thickness. Do not create wear to investigate.
For a silver-colored item with stamps, use the silver identifier. For a gold-colored nugget or flake, compare it with the gold identifier.
Native copper, slag and made objects
Metal-looking material may be a natural mineral, an industrial byproduct or a made object. Branching reddish material attached to rock can invite a native-copper comparison; metal beads within glassy material can invite a slag comparison. The page topic and a locality label do not establish either explanation. Include the attachment and surrounding material rather than cropping to the brightest patch.
Threads, regular holes, repeated dimensions or a mold-like seam may support manufacture. Irregular shape alone does not establish natural origin, since corrosion and breakage alter made objects. The National Park Service describes native copper in Michigan, but that regional history cannot establish a find’s source or age. A coin, buckle or other relic needs separate documentation for authentication.
For copper still in rock with other minerals, use the ore identifier.
Metal identifier clues and the next photo
One piece can fit two rows, such as plated iron that rusts through its coat.
What you see | What it may point to | Photo that helps next |
|---|---|---|
Salmon-red metal with green or blue-green crust | Copper (with verdigris) | A worn spot in daylight |
Yellow or golden-brown metal with green spots | Copper alloy (brass or bronze) | Close-up of a clean edge |
White metal with black tarnish, copper color at worn edges | Silver-plated copper alloy | The worn high points up close |
Light gray, dull, very light, white powder | Aluminum | The whole piece beside a coin |
Gray with orange-brown flaky rust, magnet sticks | Iron or steel (rusted) | The piece with a magnet stuck to it |
Dull blue-gray, soft-looking, heavy, white crust | Lead | Any marks or cut edges up close |
Metal detecting finds, safe checks and lead
For relics from fields, beaches and old homesites, the metal identifier describes the metal and corrosion and reads any visible letters, numbers or designs. Coins, buttons, buckles and bullets are named by type only when the design shows, and never dated or authenticated. Check the rules first: an NPS page notes that federal regulations prohibit possessing or using a metal detector in national parks. On private land, ask the owner.
If you already observed magnetic attraction, note which component responded and how it was checked. Attraction may come from a core, fitting or inclusion; non-attraction does not identify a precious metal. A photo cannot measure magnetism, density, softness or mass. Do not handle an unfamiliar object merely to complete the form, especially if its construction or purpose is uncertain.
Unknown coatings and corrosion may contain hazardous material. Avoid disturbing loose powder, sanding, heating, filing or applying acids for a photograph. Follow suitable local advice for an uncertain find rather than treating a visual label as a handling assessment. If an object resembles ammunition or a sealed industrial component, leave it undisturbed and contact the appropriate local service.
Map coatings, fittings and marks before choosing a metal
Use the first image as a map of the object. Show where each later close-up belongs, including a clasp, joint, blade, rim or exposed edge. Different components can have different materials, so keep the observation attached to its location. A mark on a handle may describe that component rather than the complete object.
Photograph a stamp straight on and from a second angle if reflections hide a character. Preserve the exact letters and numbers you can read, leaving gaps for uncertain characters. A familiar-looking number or maker-style symbol is a claim to investigate, not an assay or authentication. Include any existing acquisition record without inventing a date from corrosion.
For a follow-up, ask which visible area would separate the remaining candidates. A wider overview may help more than a stronger magnification when the issue is mixed construction. Keep the material provisional if paint or corrosion conceals it. That record gives a later conservator or analyst a clear question without encouraging damage to the object.
Purity, value and other metal questions
What is my metal made of, and how pure is it?
Photos can suggest a material group, but they cannot measure alloy percentages, purity, precious-metal content or value. A qualified analyst can choose suitable methods. Coatings and mixed construction must be considered; one surface reading does not necessarily describe the whole object.
Why won’t a magnet stick to my metal?
Many different metals and alloys have little or no attraction to an ordinary magnet. Attraction can also come from only one fitting or a hidden core. Record an existing observation without treating either response as a material certificate.
Is my green-crusted find copper, brass or bronze?
Green or blue-green crust fits copper and its alloys. Salmon-red metal at a worn spot fits copper, while yellow or golden-brown fits brass or bronze, which a photo often cannot separate. Upload a sharp close-up of the worn spot to the metal identifier.