
Identification guide
Rock and Mineral Tracking Sheet
Download a rock and mineral tracking sheet as a one-page PDF or a CSV. Use one entry per specimen.
Record the specimen number, date, finder, location and site type. Note whether the rock was in place or loose, its size and weight, and which photos you took. Keep surface observations, possible names, supporting clues and your confidence in separate fields. Add the storage location so you can find it again.
This page explains every field and why it earns its space, gives a trip routine for filling it in, and lists the mistakes that make a sheet useless a year later. A CSV version with the same columns is available for spreadsheets. A free account can save up to 200 specimens with their photos, results and notes; the paper sheet covers the field and the specimens that never get photographed.
Guide updated
What the rock and mineral tracking sheet is for
A rock with no location is a paperweight. The same gray pebble means something different from a Lake Superior beach, a Pennsylvania road cut or a bag of landscaping gravel, and the photo tool can only narrow candidates, not recover where you were. The sheet exists so that the one fact no photo can supply, provenance, is written down before it fades.
It also forces you to look. Writing grain size against your fingernail, whether a thin edge glows against daylight, whether the broken face is dull or glassy, and whether a fridge magnet pulls, takes two minutes and produces the same clues the identifier reads from your photos.
Field by field: what each line asks and why it matters
Specimen number, date and finder come first. Use a running number you also write on the bag or a strip of tape on the rock, because loose specimens separate from loose sheets within a week. The date matches the sheet to the photos on your phone.
Location has four parts: a place name anyone could find on a map, GPS coordinates copied from your phone, the kind of site (beach, road cut, river bar, quarry pile, landscaping gravel, garden), and context, in place or loose. A rock still attached to the outcrop tells you the local geology; a loose beach pebble may have travelled far in ice or river water, and garden-center gravel may come from another state.
Size and weight go in as length, width, thickness and a kitchen-scale weight. Weight matters because density is the one property a photo cannot see and the sheet can hold. Then tick the photos you took: whole specimen with a coin for scale, close-up, broken face if there is one, and a wet shot, since the wet surface shows true color and banding on dull pebbles.
Observations are the heart of the sheet. Write color dry and wet, luster in angled light (glassy, waxy, pearly, dull, metallic), grain size against a fingernail, layers or bands, holes, how it breaks (flat faces, curved conchoidal fracture, crumbly), magnet response, and a rough hardness note. The hardness note is for common rocks only: whether a fingernail, a copper coin or a steel nail leaves a mark. Never scratch a suspected gem or a polished piece; write unknown instead.
Candidate names come from the photo tool. Upload one to three photos of the same specimen and it returns up to three candidates with the visible evidence for each. Copy every name and its evidence, not just the top one, because the second candidate is often right once you add weight or location. Confidence is your own word, high, medium or low. What would settle it is the most valuable line on the page: a fresh break, a photo of the edge, a weight check, or a follow-up question.
Storage box or tray closes the sheet, so you can pull a specimen for a second photo without emptying the shelf.
Field | What to write | Common mistake |
|---|---|---|
Specimen number | Running number, also on the bag or a tape strip | Numbering sheets but not the rocks |
Date and finder | Trip date; name of the person who picked it up | Leaving the date for the evening and forgetting |
Location | Place name plus GPS from the phone | Writing only the beach or town name |
Site type | Beach, road cut, river bar, quarry pile, landscaping gravel | Not noting that gravel was bought, not found |
Context | In place, or loose | Assuming a loose pebble is local rock |
Size and weight | Three dimensions and a scale weight | Guessing weight by hand |
Photos taken | Whole with scale, close-up, broken face, wet | Only one photo of the dry outside |
Observations | Color, luster, grain, bands, holes, breaks, magnet, rough hardness | Writing the name you hope for instead of what you see |
Candidates and evidence | All candidates from the tool with the evidence for each | Copying the top name without its evidence |
Confidence | High, medium or low, with a reason | Marking high because the tool listed it first |
What would settle it | The one photo, check or question still missing | Leaving it blank |
Storage | Box, tray and slot | A box with twenty unlabeled pebbles |
Practice sheet: describe this granite without naming it
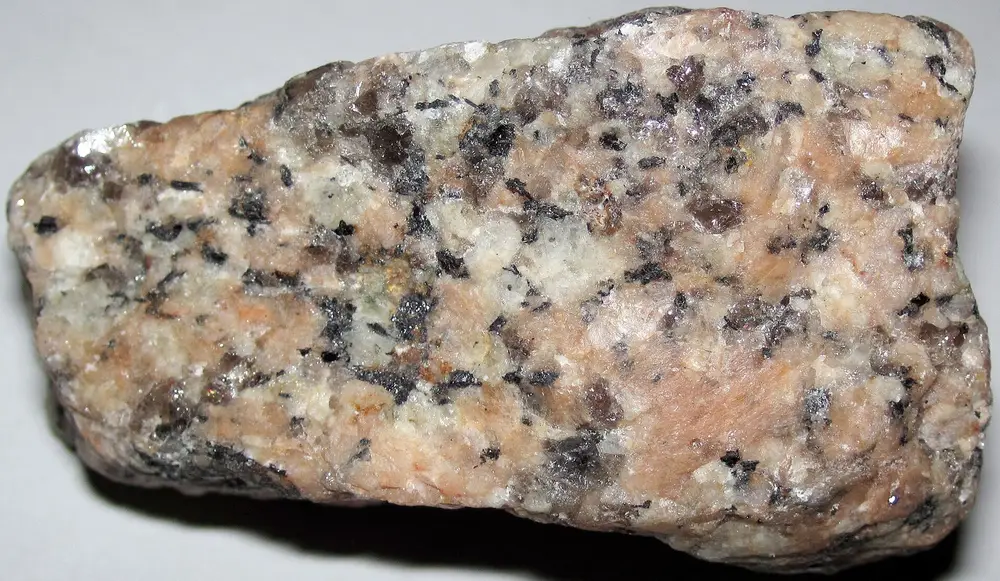
A reference photo of granite, not a field find. Fill the observation line from it: separate crystals larger than a rice grain in white, pink and black, glassy flashes from feldspar, no layers, no holes.
Granite reference photo, not a find from the area this page covers. James St. John · CC BY 2.0 · Encyclopedia entry

Fill it in during the trip, not at the kitchen table
Number the bag before the rock goes in; write the same number at the top of a fresh sheet.
Copy the GPS coordinates from your phone map while standing at the spot, then write the site type and in place or loose.
Photograph the whole rock on a dark jacket with a coin, then a close-up, then a wet shot if the surface is dull. Tick each one.
Fill the observation line in daylight: color, luster, grain size against your fingernail, bands, holes, how it breaks, magnet.
Leave candidates, confidence and storage blank until you upload the photos; add weight when you reach a scale.
At home, upload one to three photos, copy every candidate and its evidence, choose a confidence word, and write what would settle it before the rock goes in its tray.
Reading the observation line against the tool's evidence
The identifier reports what it saw: conchoidal fracture, vesicles, visible crystals, banding, a metallic flash. Set that beside your observation line. If you wrote flat faces that flash and the tool cites curved fracture, the broken-face photo was probably taken in flat light; retake it with the window to one side. If you wrote magnet responds and every candidate is non-magnetic, say so in the follow-up question. The sheet holds what the tool cannot see: weight, magnet, rough hardness and provenance.
How the paper sheet maps to your saved specimens
When you sign in, you can save each identification as a specimen with its photos, candidates, evidence and a note; Free keeps up to 200 and Plus adds favorites and named collections. The saved result holds the candidates and evidence; the note holds location, context, weight and observations, so type the sheet's lines into it and the digital record carries what the camera could not. For specimens never photographed, the paper sheet is the record, and the CSV version lets you type those pages into one spreadsheet with the same columns. Keep the specimen number identical in both places.
Questions from classrooms, scout groups and tumblers
How do we use the sheet with a class or a scout troop?
Print one sheet per student and give the group a shared numbering block, such as 1 to 30 for one trip. Require number, date, location and one photo, and make the observation line the exercise: everyone describes the same rock before anyone names it, then one photo goes to the tool and the group compares its evidence with theirs.
Does it work for rock tumbling batches?
Yes, with one change. Use one sheet per batch, write the barrel load under size and weight, and use the photos line for before and after shots of the whole batch on a dark background. The candidate line records the mix, since tumbling removes the broken faces the identifier relies on.
How many fields are required?
Four: specimen number, date, location and one photo. Everything else can be added later, but those four cannot be recovered once you leave the site.